

How to Apply Gypsum Plaster on RCC Surfaces Without Debonding?

How to Apply Gypsum Plaster on RCC Surfaces Without Debonding?
Let me be straight with you. There are few things more frustrating on a construction site than watching plaster fall off a ceiling you finished three months ago. You’ve spent the money, put in the hours, and then gravity wins anyway. If this has happened to you, you’re in good company. Half the contractors I’ve spoken to have faced this exact problem at least once.
Here’s what nobody tells you upfront: it’s almost never the gypsum plaster’s fault.
The material is fine. The problem is almost always what happened, or didn’t happen, before the plaster went on. Get that part right, and your plaster will stay put for decades.
What Is an RCC Surface and Why Is It So Difficult to Plaster?
RCC, Reinforced Cement Concrete, is everywhere in modern construction. Slabs, columns, beams, shear walls. The structural bones of the building. And the one thing all these surfaces have in common? They’re smooth. Really smooth.
When concrete sets inside a formwork, especially aluminium formwork, which has taken over most residential projects in India, the result is almost a glass-like finish. Low suction, no texture, nothing for the plaster to hold onto.
Brick walls and AAC blocks don’t have this problem. They’re rough, slightly porous, and plaster bonds to them naturally. RCC surfaces are the opposite. Apply gypsum plaster directly on an unprepared RCC ceiling and you’re essentially sticking wet material to a sealed surface, then trusting gravity not to notice.
Gravity always notices.
What Does Gypsum Plaster Debonding Look Like?
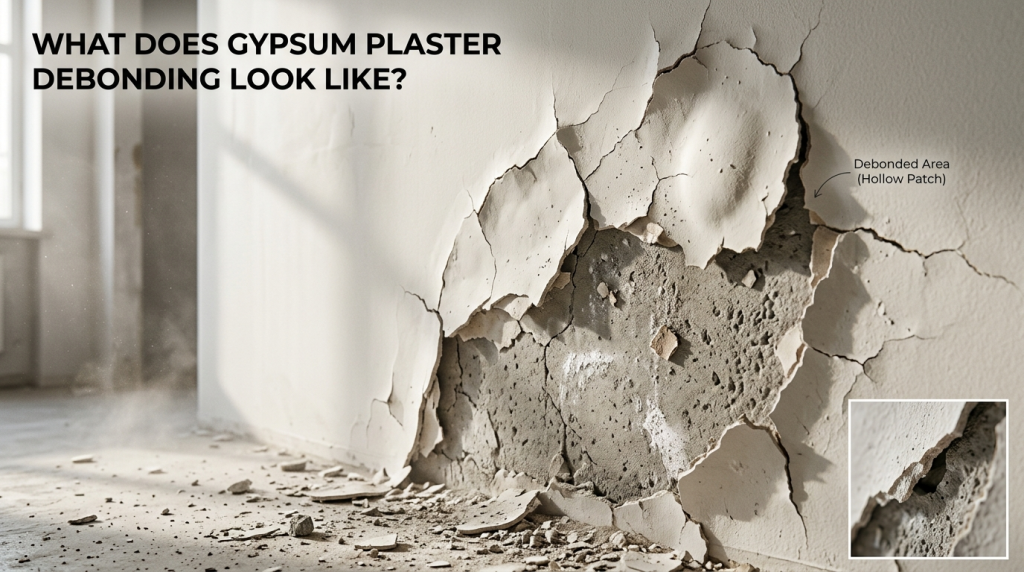
You don’t always know you have a debonding problem until it’s already serious. But there are early signs, and catching them early matters.
The most reliable test is the knuckle knock. Tap the plastered surface. A solid thud means good adhesion. A hollow, drum-like sound means there’s an air pocket forming between the plaster and the base. That’s debonding in progress.
Other things to watch for: fine hairline cracks appearing across the surface, small patches beginning to peel, usually starting at ceiling edges or where RCC meets brickwork, and in some cases, a slight bulge or blister on the surface, particularly in rooms with poor airflow.
On ceilings, once this process starts, it doesn’t reverse. The weight of the plaster works against you every single day.
Why Does Gypsum Plaster Debond from RCC Surfaces?
There are a handful of root causes, and most sites are dealing with more than one at the same time.
The surface has almost no suction. RCC doesn’t absorb water the way brick does. When you apply plaster, there’s nothing pulling it in or helping it grip. It just sits on top.
Mould oil left on the formwork surface. Aluminium formwork is coated with a release agent before every pour. When the shuttering comes off, a thin film of that oil stays on the concrete. You might not even see it, but gypsum plaster absolutely cannot bond to it. Even a light residue is enough to cause failure.
No surface preparation at all. This is the big one. A lot of sites skip prep to save time, especially under schedule pressure. Plaster goes straight onto bare RCC. It might look fine for a few weeks. Then it starts to go.
Gravity on ceilings. Walls are one thing. Ceilings are fighting a constant downward pull on top of everything else, thermal expansion, vibration from the building, minor structural movement. The bond needs to be strong enough to handle all of that. A weak bond on a ceiling doesn’t just fail. It falls.
Plaster applied too thick in one go. Go above 18mm in a single coat and the outer layer sets before the inner layer does. That difference in setting rates creates internal tension, and that tension eventually cracks the surface and breaks the bond.
Dust and contamination. A dusty RCC surface is a hidden problem. The plaster bonds to the dust layer, not the concrete. Then the dust shifts, and the plaster goes with it.
The Old Method: Hacking – Why It No Longer Works
For a long time, hacking was the standard answer to this problem. You’d take a hammer and chisel to the RCC surface, chip it up to create texture, and give the plaster something to grab onto.
It works in principle. But in practice, on modern sites, it has real problems.
Hacking is entirely manual, which means the depth and consistency completely depend on who’s doing it and how tired they are by noon. On modern aluminium formwork surfaces, the concrete is so dense that getting proper hacking depth is genuinely hard work. You end up with some spots done well and others barely touched, and those undertreated spots become your debonding zones.
There’s also the time and labour cost, which adds up fast across a full project.
The honest answer is that hacking made sense when it was the only option. It’s not anymore..
The Right Solution: A Bonding Agent for Gypsum Plaster
A bonding agent is a chemical liquid you apply to the RCC surface before plastering. For cement-sand plaster applications on smooth or low-suction RCC surfaces, Grip Plast is the recommended bonding agent — specifically designed for that substrate combination. The good ones work two ways simultaneously. The fine aggregates in the formula create a rough, textured surface for the plaster to grip mechanically, while the active compounds form a chemical bond with the concrete substrate.
The result is a prepared surface that behaves nothing like bare RCC. Instead of a smooth sealed wall with no suction, you’ve got a surface that the plaster can genuinely hold onto.
For RCC ceilings specifically, using a bonding agent isn’t really optional if you want the job to last. It’s the only method that delivers consistent adhesion against continuous gravity and the other stresses ceilings face.
Step-by-Step: How to Apply Gypsum Plaster on RCC Surfaces Without Debonding
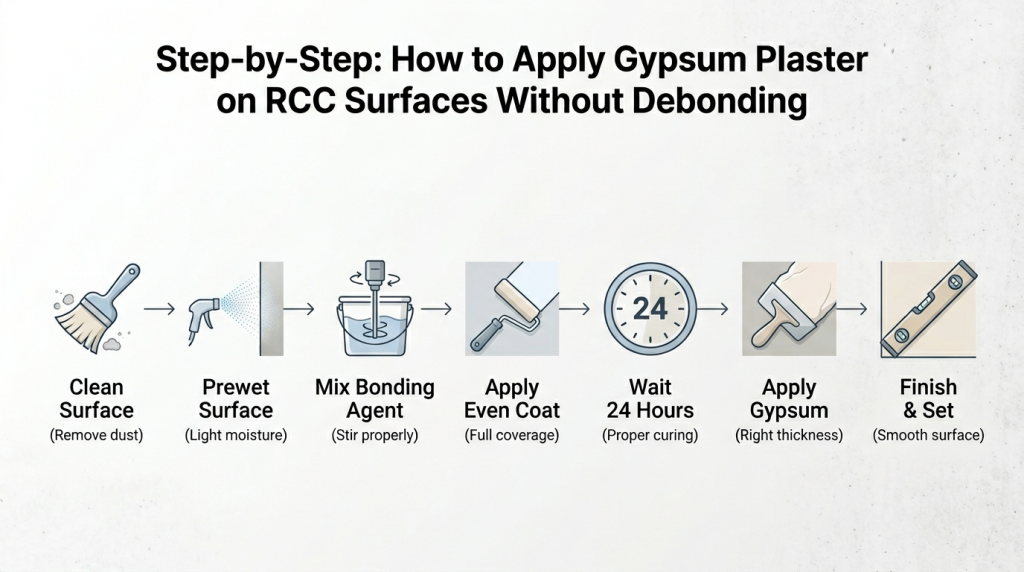
This is the process. Follow it on every RCC surface. No shortcuts.
Step 1: Clean the surface properly.
Start with a stiff brush and clear off every bit of dust, loose concrete, and debris. Then check carefully for mold oil. If you see any shiny or slightly greasy patches, wipe them down with a dry cloth or a mild solvent. Don’t skip this. Oil underneath will sabotage everything that comes after.
Also look for honeycombing, surface voids, or cracks. Fix those before you do anything else. Plaster is a finish, not a repair material.
Step 2: Lightly prewet the surface.
Before applying the bonding agent, mist the surface lightly with water. You’re not trying to soak it, just enough to knock off any remaining fine dust and keep the surface from drawing moisture out of the bonding agent too fast. A damp roller pass is usually enough.
Step 3: Mix the bonding agent thoroughly.
This step matters more than it sounds. Bonding agents contain solid aggregates suspended in liquid. If you don’t stir it well, those aggregates settle to the bottom. You end up applying a thin, weak liquid at the top of the container, and the rough texture that creates the mechanical key simply isn’t there.
Stir slowly and completely until the mixture is consistent all the way through.
Step 4: Apply it evenly across the whole surface.
Use a good-quality brush or roller. Cover everything, not just the open face of the wall or ceiling, but corners, edges, column junctions. Those junctions between RCC and brickwork are exactly where debonding tends to start first.
An uneven coat creates weak spots. Weak spots become cracks. Be consistent.
Step 5: Wait the full 24 hours. Don’t rush this.
This is where most sites go wrong. After applying the bonding agent, you need to wait approximately 24 hours before any plaster goes on.
During that time, the agent is curing. The aggregates are forming a rough, tacky surface. The chemical compounds are bonding into the concrete. If you plaster over a wet bonding agent, you undo all of it. The plaster bonds to the wet surface layer, not the concrete, and the whole thing fails.
Set the timeline on your schedule and protect it. This wait is not wasted time. It’s what makes the rest of the job work.
Step 6: Apply gypsum plaster at the right thickness.
Once the bonding agent has fully dried, you’re ready to plaster. If you are using Kaboon Gypsum Plaster, follow the application thickness and mixing guidelines for best results. Keep your coat between 6mm and 18mm. Not thinner, not thicker. Use a straight trowel, work in consistent sections, and use level strips or screed guides to keep the surface even.
On walls, start from the top and work down. On ceilings, work from one end to the other in a steady, controlled pass.
Step 7: Finish and let it set.
Once the plaster is spread, finish the surface with a steel trowel using smooth circular motions. Do this as the plaster starts to firm up, not too early and not too late.
Keep the room ventilated but shield it from strong wind or direct sun during setting. Gypsum doesn’t need water curing like cement plaster does, but fast, uneven drying will give you surface cracks. Let it set completely before any further work begins.
Mistakes That Are Easy to Make and Hard to Fix
Even experienced contractors make these errors. Worth knowing before you start.
Skipping the bonding agent entirely is the most expensive shortcut on any RCC project. The rework cost, material waste, and site delay from a debonded ceiling will always cost more than the bonding agent would have.
Not cleaning mould oil before applying any treatment. The bonding agent cannot work through oil. Clean first, always.
Plastering while the bonding agent is still wet. A common mistake under deadline pressure, and one that cancels out the entire preparation step.
Leaving dry patches in the bonding agent coat. Those become weak zones. Go back and touch them up before the coat dries.
Going too thick in one coat. Above 18mm, the stress builds up from inside and the surface fails from within.
Ignoring the RCC-to-brick junction. This transition zone is under more stress than the open wall face. It needs the same, if not more, attention during surface prep.
For tile, marble, or granite surfaces in the same project, Grip Stone is used to prepare those surfaces for bonding before installation.
GypTight & GypBond by Laxmi Structures & Fixtures LLP
At Laxmi Structures & Fixtures LLP, we built GypTight and GypBond because we kept seeing the same problem repeat itself across projects all over India. Good contractors, good plaster, bad surface preparation. The result was always the same.
GypTight is designed specifically for RCC ceilings and walls, including the dense, smooth surfaces that come off aluminium formwork. It works through dual-action bonding, mechanical grip from the fine aggregates and chemical adhesion from the active compounds, and prepares a surface for plastering within 24 hours.
GypBond works across RCC, concrete, and smooth masonry to improve adhesion and reduce plaster failure on internal walls.
Both products eliminate the need for hacking, reduce preparation time, and are used across residential and commercial projects throughout India.
Final Word
Debonding isn’t a material failure. It’s a process failure. And it’s almost entirely preventable.
Clean the surface. Apply a quality bonding agent. Give it the full drying time. Plaster at the right thickness. Do those four things consistently and debonding simply stops being a problem on your sites.
The difference between plaster that lasts one year and plaster that lasts twenty years comes down to that one preparation step and how carefully it’s done.
If you’re working on RCC structures and want to get it right from the start, GypTight and GypBond are built for exactly that job. Reach out to us at Laxmi Structures and Fixtures LLP and we’ll help you figure out the right solution for your project.
Frequently Asked Questions
A: Technically yes, but it is not advisable. RCC surfaces have low suction and smooth texture. Without a bonding agent, gypsum plaster has very little to grip onto, and debonding — especially on ceilings — is highly likely within months of application.
A: Allow the bonding agent to dry for approximately 24 hours before applying gypsum plaster. This drying period is critical for the agent to form a firm, rough bonding layer on the surface. Plastering before the agent dries fully reduces its effectiveness significantly.
A: No. A properly applied bonding agent replaces the need for hacking entirely. In fact, research and field experience show that bonding agents deliver up to 5 times higher pull-out strength compared to conventional manual hacking — with far more consistency.
A: A hollow or drum-like sound when tapping plastered RCC surfaces indicates air pockets between the plaster and the base — an early sign of debonding. This typically happens due to poor surface preparation, skipping the bonding agent, or applying plaster on a surface still wet from bonding agent application.
A: Yes. GypTight and GypBond are specifically formulated for the smooth, dense, low-suction surfaces produced by aluminium formwork systems — one of the most challenging surfaces for gypsum plaster adhesion.
A: The recommended maximum thickness for a single coat of gypsum plaster on any surface is 18mm. Thicker applications create excess weight and internal stress that leads to cracking and debonding.
A: Yes, gypsum plaster is widely used on RCC ceilings across India. However, it must always be applied over a properly dried bonding agent to counter the low suction of the RCC surface and the constant downward pull of gravity on the ceiling plaster.
